

Table of Contents
- What You'll Need Before Installing Your Dash Cam
- Choosing the Right Dash Cam Placement in Your SUV
- How to Hardwire a Dash Cam: Power Options Explained
- Routing Dash Cam Wires in Hatchback and Liftgate Models
- Step-by-Step Installation Process
- Common Mistakes to Avoid During Installation
- Post-Installation Maintenance and Troubleshooting
- Conclusion
Last Updated: August 26, 2026
What You'll Need Before Installing Your Dash Cam
Installing a dash cam in your SUV requires proper tools and materials to ensure safe wiring and a professional finish.
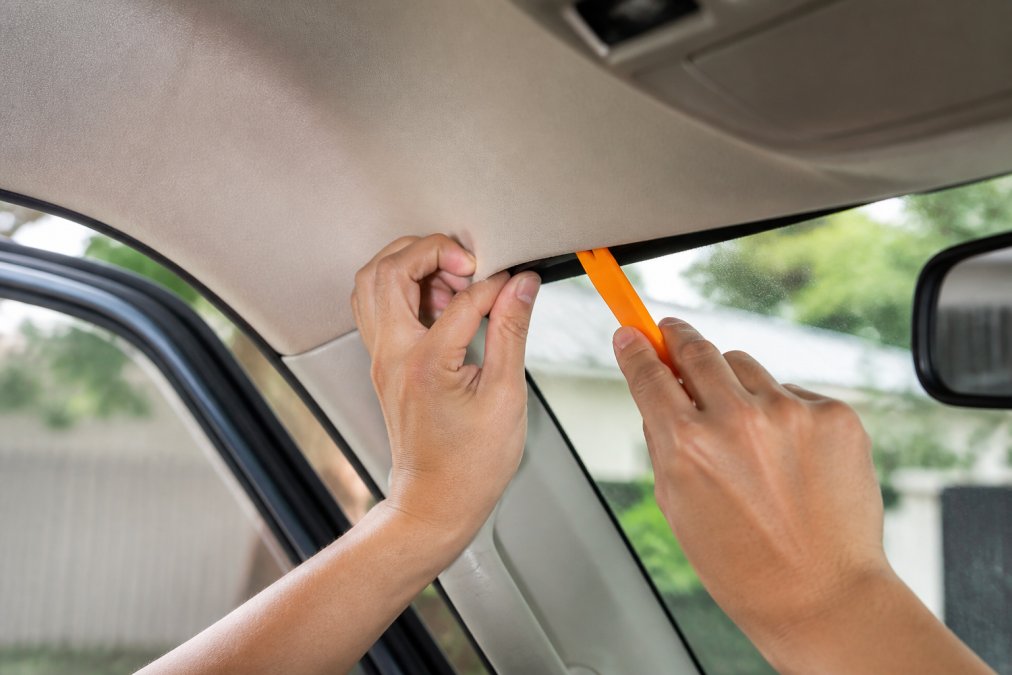
Start with a trim removal tool (also called a panel removal tool). This plastic or rubber tool prevents damage to your vehicle's interior panels as you access cable routing paths. Metal tools will scratch and crack trim.
A hardwire kit is essential if you're connecting to your vehicle's fuse box instead of using the cigarette lighter. This kit includes the fuse tap, inline fuse holder, and necessary connectors to safely draw power from your electrical system. You'll also need a multimeter to test voltage and verify correct power sources.
For cable management, grab adhesive clips or cable ties to secure wiring along your headliner and trim. A rubber grommet is critical if routing cables through the firewall or door jambs, protecting wires from sharp metal edges.
Finally, gather electrical tape, a flashlight or headlamp, and a small screwdriver set. Keep your vehicle's service manual handy to locate the fuse box and identify which fuses control constant versus ignition-switched power.
Choosing the Right Dash Cam Placement in Your SUV
Where you mount your dash cam determines both video quality and installation difficulty. The ideal placement captures your forward field of view while remaining inconspicuous behind your rearview mirror or along the top of your windshield.
Most dash cams work best mounted near the center, behind or slightly offset from the rearview mirror. This position minimizes glare, captures the road ahead clearly, and keeps the camera out of your direct line of sight. The wiring can then run down the driver's side of the headliner.
For SUVs with panoramic sunroofs or tall windshields, you may need to mount further back on the headliner to stay within the camera's optimal viewing angle. Most cameras have a 140-170 degree field of view, so placement matters significantly for capturing useful footage.
If installing a rear-facing camera, consider the liftgate or rear window. Plan your cable routing before mounting to avoid running wires across areas where they'll get pinched or crushed.
How to Hardwire a Dash Cam: Power Options Explained
Hardwiring your dash cam to your vehicle's electrical system offers advantages over using the cigarette lighter outlet. A hardwired setup provides cleaner power, eliminates bulky adapters, and enables parking mode, which records when your vehicle is parked and detects motion or impacts.
Constant Power vs. Switched Power
Constant power flows through your electrical system whenever the battery has charge, regardless of ignition status. Switched power only activates when you turn the ignition on. Most dash cams should connect to switched power to avoid draining your battery when the vehicle sits unused.
If your dash cam supports parking mode and you want to record while parked, you'll need a setup combining both. The camera connects to constant power for parking mode, while a voltage cutoff module monitors battery voltage and shuts down recording if the battery drops too low.
Switched power is simpler to install and suitable for basic recording during driving. Look for fuses that power your windshield wipers, cigarette lighter, or interior lights, these typically use switched power and draw moderate current.
Finding Your Vehicle's Fuse Box
Your SUV's fuse box is typically located under the dashboard on the driver's side, though some models place it under the hood. Check your owner's manual for the exact location.
Once located, photograph or write down the fuse diagram. This shows which fuses control which systems and their amperage ratings, helping you identify which fuses provide constant and switched power without overloading the circuit.
A fuse puller (often included in your hardwire kit) makes removing fuses safely much easier than using your fingers. Insert the puller's two prongs around the fuse and gently pull straight out. Never force a fuse.
Test any potential fuse location with your multimeter before making connections. Set the multimeter to DC voltage, touch the red probe to the fuse terminal, and the black probe to a chassis ground. A reading of 12-14 volts indicates constant power; a reading only when the ignition is on indicates switched power (nhtsa.gov).
Routing Dash Cam Wires in Hatchback and Liftgate Models
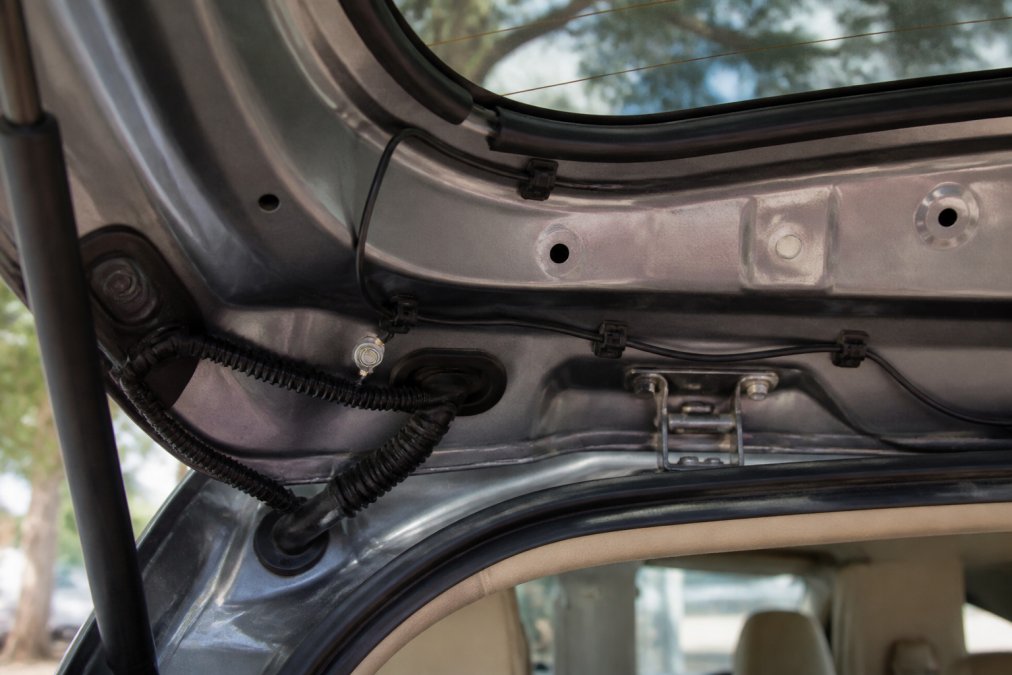
SUVs present unique challenges for cable routing because of their hatchback or liftgate rear doors. Unlike sedans with sealed trunks, SUVs require you to route cables through the interior trim, around the cargo area, and often through the liftgate itself if installing a rear-facing camera.
Start by identifying your cable routing path before pulling trim. In most SUVs, the safest route runs along the driver's side headliner, down the driver's side door jamb, along the interior side panel, and toward the rear. This keeps cables away from airbag zones and minimizes the risk of wires getting pinched.
Managing Cable Slack and Avoiding Airbag Zones
Excess cable creates visible bulges under trim and can get caught on moving components. Use adhesive clips spaced every 12-18 inches to secure cables snugly against the interior surface (sae.org).
Side-curtain airbags deploy along the interior side panels and doors in many modern SUVs. Never route power cables, ground wires, or camera cables directly over airbag zones. Consult your vehicle's service manual to identify where these airbags are located.
When routing cables through the liftgate, use a rubber grommet where wires pass through the weatherstripping seal. This protects insulation from sharp edges and prevents chafing that could expose bare wire.
For SUVs with rear entertainment systems or existing liftgate wiring, trace those cables to understand how the manufacturer routed them. Following the same path usually means the route is proven safe.
Step-by-Step Installation Process
Step 1: Prepare Your Interior Trim
Begin by removing your vehicle's interior trim panels to access the cable routing path. Start at the top of the windshield and work downward. Use your trim removal tool to gently pry the edge of the headliner panel away from the frame.
Once the headliner is loose enough to access, create just enough space to feed your cables through. This preserves the trim's structural integrity and makes reinstallation easier.
Step 2: Route the Power Cable
Feed your power cable from the fuse box location up through the interior, following your planned route along the headliner. Move slowly and check for obstacles, wires, hoses, and structural supports can get in the way.
As you route the cable, secure it with adhesive clips every 12-18 inches. Keep the cable tight against the surface but not so tight that you risk damaging insulation.
When the power cable reaches your dash cam location, cut it to appropriate length and strip about half an inch of insulation from the end. Connect this to your dash cam's power input according to the camera's manual.
Step 3: Connect to Your Fuse Box
With your power cable routed and secured, make the fuse box connection. First, turn off your vehicle's ignition and disconnect the negative battery terminal to prevent accidental shorts.
Locate your chosen fuse and remove it using the fuse puller. Insert the fuse tap into the empty fuse slot, then reinsert your original fuse into the top of the tap.
Crimp or solder the power cable to the fuse tap's power terminal. If you're not comfortable soldering, use crimp connectors with a crimping tool. Ensure the connection is tight and won't come loose from vibration.
Step 4: Install Rear-Facing Camera (if applicable)
If you're adding a rear-facing camera, route its cable from the liftgate area forward along the same path as your power cable. Use the same adhesive clips to secure the rear camera cable.
For liftgate-mounted cameras, drill a small hole through the trim where the cable exits the liftgate interior. Insert a rubber grommet into this hole to protect the cable insulation.
The rear camera's power connection typically branches from your main power cable or connects to a separate fuse tap. Check your camera's manual for specific instructions.
Step 5: Test and Secure All Connections
Before reinstalling any trim panels, reconnect your vehicle's battery and test the installation. Turn on the ignition and verify that your dash cam powers up and begins recording. Check that both forward and rear cameras display video.
Use your multimeter to verify voltage at the fuse box connection. Once everything tests successfully, turn off the ignition and carefully reinstall your interior trim panels, working from bottom to top.
Common Mistakes to Avoid During Installation
The most frequent error is routing cables across side-curtain airbag zones. This creates a serious safety hazard, if an airbag deploys during a collision, the cable can interfere with proper deployment. Always consult your vehicle's service manual before routing any cables.
Connecting to the wrong fuse is another common mistake. Using a fuse that powers a high-draw component like your headlights can cause the fuse to blow repeatedly. Test every potential fuse location with your multimeter before making connections.
Failing to secure cables properly leads to visible bulges under trim panels and wires that rattle loose over time. Use adhesive clips generously, they're inexpensive and make the difference between a professional-looking installation and a hastily done one.
Over-tightening trim panels during reinstallation can crack plastic. Press panels in firmly but don't force them, they should click into place with moderate pressure.
Post-Installation Maintenance and Troubleshooting
After installation, check your dash cam monthly to ensure it's still recording properly. Most cameras display a status indicator showing battery voltage and recording status.
Format your dash cam's SD card every 30 days using the camera's built-in formatting function. This maintains file system integrity and prevents corruption. Never format the card on your computer.
If your camera stops recording after a few weeks, the most likely cause is a loose connection at the fuse box. Vibration from driving can gradually loosen crimped connections. Periodically check your fuse box connection by gently tugging on the cable.
For rear-facing cameras in liftgates, inspect the rubber grommet quarterly to ensure it's still protecting the cable. If you notice any insulation damage, wrap the affected area with electrical tape immediately.
Battery drain is a sign that your camera is drawing power when the vehicle is off. If using switched power, this shouldn't happen. If using constant power with parking mode, verify that your voltage cutoff module is set to the correct threshold, typically 11.5-12 volts (nhtsa.gov).
Installing a dash cam in your SUV doesn't require professional help if you take your time and follow proper procedures. The key is understanding your vehicle's electrical system, planning your cable route carefully, and avoiding airbag zones. At The Daily Drop by Ed Rivera, we offer hardwire kits, trim removal tools, and other installation accessories. Start with the right tools and take your installation step by step, you'll have professional-quality dash cam recording protecting your vehicle in no time.
| Step | Time Required | Difficulty |
|---|---|---|
| Prepare interior trim | 15-20 minutes | Easy |
| Route power cable | 20-30 minutes | Moderate |
| Connect fuse box | 10-15 minutes | Moderate |
| Install rear camera | 20-25 minutes | Moderate |
| Test and reinstall trim | 15-20 minutes | Easy |
| Total installation | 90-120 minutes | Moderate |
Frequently Asked Questions
Q: Can I install a dash cam myself without professional help?
A: Yes. Most SUV owners can install a dash cam themselves if they follow the steps carefully. The process involves basic tools like a trim removal tool, fuse tap, and a multimeter to verify connections. Start with the camera placement and power routing, then work through the fuse box connection. Take your time with cable management to avoid damaging interior trim or airbag sensors. If you're uncomfortable working with your vehicle's electrical system, professional installation is always an option.
Q: How do I hide dash cam wires in my SUV without them showing?
A: Route wires along the headliner and interior trim using adhesive mounts and wire concealment clips. For SUVs with liftgates, run cables along the door frames and use the rubber grommet openings where factory wiring passes through. Tuck excess cable slack behind panels and trim pieces. Use a trim removal tool to carefully lift headliner sections, then run wires underneath before reinstalling trim. This approach keeps wires hidden from view while protecting them from damage.
Q: What's the difference between hardwiring and using a cigarette lighter connection?
A: Hardwiring connects your dash cam directly to your vehicle's fuse box, providing constant or switched power depending on your setup. This keeps wires hidden and allows parking mode recording when the engine is off. A cigarette lighter connection is simpler but leaves a visible cable running to the power outlet and stops recording when you turn off the engine. Hardwiring requires a fuse tap and basic electrical knowledge but offers better performance and aesthetics for SUV installations.
Q: How do I avoid cutting into airbag wires when routing cables?
A: Identify side-curtain airbag locations in your SUV's door panels and headliner before routing any cables. Use a multimeter to test unfamiliar wires before cutting or moving them. Route dash cam cables away from the A-pillar and along the top of the headliner toward the rear. Stay clear of any orange or yellow wiring, which typically indicates airbag circuits. When in doubt, consult your vehicle's service manual or have a professional route the cables for you to ensure safety.
This article was written using GrandRanker